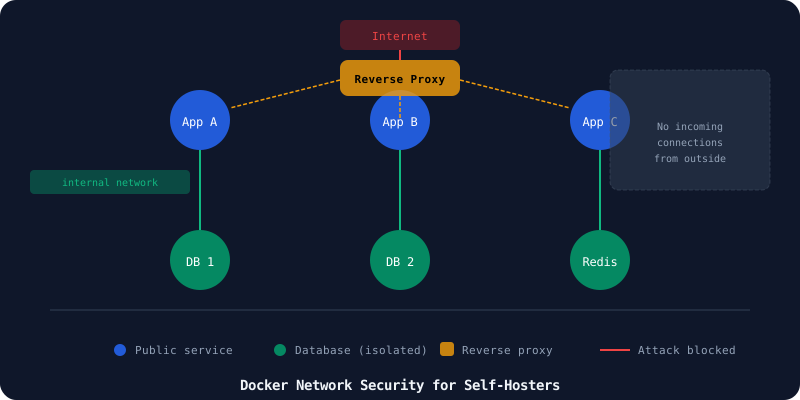
Docker Network Security for Self-Hosters: Isolation, Firewalls, and Real-World Setup
Most self-hosters run every container on the default bridge network. Here's why that's risky — and how to properly isolate your apps with Docker networks, internal zones, and firewall rules.
I ran every container on the default bridge network for two years. It worked. Everything could talk to everything. My Nextcloud could reach my database, my blog could reach Redis, and — critically — my random experiments could reach my production database.
I didn’t realize that was a problem until I spun up a container with a known vulnerability just to test something. That container was on the same network as my Postgres instance. No firewall. No isolation. One CVE away from losing my data.
Docker’s default networking is convenient, but it’s designed for developer laptops, not production self-hosted setups. The good news? Fixing it takes 30 minutes and makes your infrastructure genuinely harder to compromise.
The Problem With the Default Bridge
When you install Docker, every container you run without specifying a network ends up on bridge — the default bridge network. Containers on this network can talk to each other by IP, and there’s no authentication between them.
I’ve seen setups where:
- A random utility container can reach the production database
- A web app can talk to the Redis cache of another app
- A container with a publicly known vulnerability has network access to internal services
This is the Docker equivalent of putting your servers in the same room and assuming nobody will touch anything they shouldn’t.
Docker’s default bridge doesn’t provide DNS resolution between containers either. You have to use --link (deprecated) or rely on IP addresses. User-defined networks fix both problems — isolation and DNS.
The Architecture I Use
Here’s the network layout I use on every self-hosted server now:
Internet → Reverse Proxy → Public network (exposed containers)
                                ↓
                         Internal network (databases, caches, tools)
                                ↓
                         Private network (admin-only services)
Each layer has its own Docker network. Containers on one layer cannot reach containers on another unless explicitly allowed.
Let me show you how to set this up.
Step 1: Create Your Networks
Start by creating three Docker networks. I keep them consistent across every Compose file:
docker network create traefik-public
docker network create internal
docker network create private- traefik-public: Only the reverse proxy and services that need direct HTTP access
- internal: Databases, caches, and backend services that apps talk to
- private: Admin panels, monitoring dashboards, SSH-like tools
Step 2: Wire Your Reverse Proxy
I use Traefik, but the same pattern works with Caddy, Nginx Proxy Manager, or anything else.
# docker-compose.yml for reverse proxy
services:
  traefik:
    image: traefik:v3.1
    container_name: traefik
    restart: unless-stopped
    ports:
      - "80:80"
      - "443:443"
    networks:
      - traefik-public
    volumes:
      - /var/run/docker.sock:/var/run/docker.sock:ro
    # ... config omitted for brevity

networks:
  traefik-public:
    external: true
The reverse proxy lives on traefik-public. It’s the only container that receives traffic from the internet.
Step 3: Isolate Your Apps
Here’s where the magic happens. Each app gets two networks: one for receiving traffic (from the proxy), one for talking to its dependencies.
Example: Nextcloud + PostgreSQL
services:
  nextcloud:
    image: nextcloud:stable
    container_name: nextcloud
    restart: unless-stopped
    networks:
      - traefik-public
      - internal
    # Traefik labels for routing
    labels:
      - "traefik.enable=true"
      - "traefik.http.routers.nextcloud.rule=Host(`cloud.yourdomain.com`)"
      - "traefik.http.routers.nextcloud.entrypoints=websecure"
      - "traefik.http.services.nextcloud.loadbalancer.server.port=80"
    depends_on:
      - nextcloud-db

  nextcloud-db:
    image: postgres:16-alpine
    container_name: nextcloud-db
    restart: unless-stopped
    networks:
      - internal
    environment:
      POSTGRES_DB: nextcloud
      POSTGRES_USER: nextcloud
      POSTGRES_PASSWORD: changethis
    volumes:
      - nextcloud-db-data:/var/lib/postgresql/data

networks:
  traefik-public:
    external: true
  internal:
    external: true

volumes:
  nextcloud-db-data:
What this achieves:
- Nextcloud is on
traefik-public(reverse proxy can reach it) andinternal(can reach the database) - PostgreSQL is ONLY on
internal. No direct access from the internet. No access from any other app’s network. - If another container on
traefik-publicgets compromised, it can’t reach the database directly.
Step 4: Private Network for Admin Tools
Some services should never be exposed to the internet — not even through a reverse proxy. Dashboards, admin panels, monitoring tools, and SSH gateways belong on the private network.
services:
  portainer:
    image: portainer/portainer-ce:latest
    container_name: portainer
    restart: unless-stopped
    networks:
      - private
    volumes:
      - /var/run/docker.sock:/var/run/docker.sock:ro
      - portainer-data:/data

  dozzle:
    image: amir20/dozzle:latest
    container_name: dozzle
    restart: unless-stopped
    networks:
      - private
    volumes:
      - /var/run/docker.sock:/var/run/docker.sock:ro

networks:
  private:
    external: true

volumes:
  portainer-data:
Access these through a VPN (WireGuard, Tailscale) or an SSH tunnel. Never expose them to the public internet.
# SSH tunnel to access Portainer
ssh -L 9000:localhost:9000 your-vps-ip
# Then open http://localhost:9000 in your browser
Step 5: Firewall the Docker Host
Docker networks are virtual, but published ports aren’t. When you map a container port to the host with ports: in Compose, Docker opens that port on the host’s firewall unless you’re careful.
I use UFW and configure it to only allow what’s needed:
# Default deny incoming
sudo ufw default deny incoming
sudo ufw default allow outgoing

# Allow SSH
sudo ufw allow ssh

# Allow HTTP/HTTPS for the reverse proxy
sudo ufw allow 80/tcp
sudo ufw allow 443/tcp

# Allow WireGuard if you use it
sudo ufw allow 51820/udp

# Deny everything else
sudo ufw enable
The key insight: if your reverse proxy is the only container that binds to ports 80 and 443 on the host, and you don’t publish ports for other containers, they’re not reachable from the outside even if they’re compromised.
What I Learned the Hard Way
1. External networks are the right call
I used to define networks inside each Compose file. Every app had its own nextcloud_network and database_network. It worked, but it was a mess. Moving to external networks (docker network create) simplified everything. One network definition, shared across all services, consistent naming.
2. Not everything needs to be on the public network
I used to put every web app on the same network as the proxy. Then I realized my admin panel (Portainer, Dozzle, Grafana) doesn’t need to be there. Moving them to private and accessing via VPN was a massive security win with zero convenience loss.
3. Traefik labels beat manual port mapping
With Traefik, I don’t publish ports for most containers. Traefik routes traffic internally using Docker labels. This means my containers aren’t exposed on the host’s IP at all — they’re only reachable through the reverse proxy. One less attack surface.
4. You can mix networks on the same container
A container can be on multiple networks. Nextcloud is on traefik-public (for the proxy) and internal (for the database). This is the right pattern. A database should only be on internal. Don’t put databases on the public network just because it’s easier.
5. Test your isolation
After setting up networks, verify that containers can’t reach what they shouldn’t:
# Exec into a container and try to reach another service
docker exec -it nextcloud bash
# Try to reach the database of another app
curl postgresql-other-app:5432
# Should timeout or refuse connection
If it connects, you’ve got a network config issue. Fix it before moving on.
The Complete Example: Multi-App Setup
Here’s a real Compose file from my server showing three apps with proper network isolation:
services:
  # --- Reverse Proxy ---
  traefik:
    image: traefik:v3.1
    container_name: traefik
    restart: unless-stopped
    ports:
      - "80:80"
      - "443:443"
    networks:
      - traefik-public
    volumes:
      - /var/run/docker.sock:/var/run/docker.sock:ro
      - ./traefik/traefik.yml:/etc/traefik/traefik.yml
      - ./traefik/acme.json:/acme.json

  # --- App 1: Nextcloud ---
  nextcloud:
    image: nextcloud:stable
    container_name: nextcloud
    restart: unless-stopped
    networks:
      - traefik-public
      - internal
    labels:
      - "traefik.enable=true"
      - "traefik.http.routers.nextcloud.rule=Host(`cloud.yourdomain.com`)"
      - "traefik.http.routers.nextcloud.entrypoints=websecure"
    volumes:
      - nextcloud-data:/var/www/html

  nextcloud-db:
    image: postgres:16-alpine
    container_name: nextcloud-db
    restart: unless-stopped
    networks:
      - internal
    environment:
      POSTGRES_DB: nextcloud
      POSTGRES_USER: nextcloud
      POSTGRES_PASSWORD: ${NEXTCLOUD_DB_PASSWORD}
    volumes:
      - nextcloud-db-data:/var/lib/postgresql/data

  # --- App 2: Miniflux (RSS Reader) ---
  miniflux:
    image: miniflux/miniflux:latest
    container_name: miniflux
    restart: unless-stopped
    networks:
      - traefik-public
      - internal
    labels:
      - "traefik.enable=true"
      - "traefik.http.routers.miniflux.rule=Host(`rss.yourdomain.com`)"
      - "traefik.http.routers.miniflux.entrypoints=websecure"
    environment:
      DATABASE_URL: postgres://miniflux:${MINIFLUX_DB_PASSWORD}@miniflux-db/miniflux?sslmode=disable

  miniflux-db:
    image: postgres:16-alpine
    container_name: miniflux-db
    restart: unless-stopped
    networks:
      - internal
    environment:
      POSTGRES_DB: miniflux
      POSTGRES_USER: miniflux
      POSTGRES_PASSWORD: ${MINIFLUX_DB_PASSWORD}
    volumes:
      - miniflux-db-data:/var/lib/postgresql/data

  # --- App 3: Vaultwarden (Password Manager) ---
  vaultwarden:
    image: vaultwarden/server:latest
    container_name: vaultwarden
    restart: unless-stopped
    networks:
      - traefik-public
      - internal
    labels:
      - "traefik.enable=true"
      - "traefik.http.routers.vaultwarden.rule=Host(`vault.yourdomain.com`)"
      - "traefik.http.routers.vaultwarden.entrypoints=websecure"
    volumes:
      - vaultwarden-data:/data
    environment:
      DOMAIN: https://vault.yourdomain.com
    # Vaultwarden uses SQLite, no separate DB needed

  # --- Admin Tools (Private Network) ---
  portainer:
    image: portainer/portainer-ce:latest
    container_name: portainer
    restart: unless-stopped
    networks:
      - private
    volumes:
      - /var/run/docker.sock:/var/run/docker.sock:ro
      - portainer-data:/data

  dozzle:
    image: amir20/dozzle:latest
    container_name: dozzle
    restart: unless-stopped
    networks:
      - private
    volumes:
      - /var/run/docker.sock:/var/run/docker.sock:ro

networks:
  traefik-public:
    external: true
  internal:
    external: true
  private:
    external: true

volumes:
  nextcloud-data:
  nextcloud-db-data:
  miniflux-db-data:
  vaultwarden-data:
  portainer-data:
What this setup gives you:
- Each database is only on
internal. No other container can reach it unless it’s also oninternal - Admin tools are on
private. Only accessible via VPN - The reverse proxy is the only container on the host’s published ports
- If one app gets compromised, the attacker can’t reach other apps’ databases
- Each app’s database is isolated from every other app’s database
🚀NordVPN
Secure your VPS network with a reliable VPN for admin access.
Affiliate link — we may earn a commission at no extra cost to you.
Advanced: Docker Firewall Rules with iptables
Docker manages iptables rules automatically. This is usually fine, but it means Docker containers can bypass UFW rules if you’re not careful.
To prevent Docker from manipulating iptables directly:
# In /etc/docker/daemon.json
{
  "iptables": false
}
Then restart Docker:
sudo systemctl restart dockerWarning: This breaks container-to-container networking unless you manage iptables yourself. Only do this if you know what you’re doing. For most self-hosters, Docker’s default iptables management is fine as long as you don’t publish unnecessary ports.
A simpler approach that works well: use UFW’s Docker integration via ufw-docker:
# Install ufw-docker
sudo wget -O /usr/local/bin/ufw-docker \
  https://github.com/chaifeng/ufw-docker/raw/master/ufw-docker
sudo chmod +x /usr/local/bin/ufw-docker

# Apply rules
sudo ufw-docker install
This makes UFW actually respect Docker’s port mappings. After running it, publishing a port in Compose won’t bypass UFW — the firewall will actually block it unless you explicitly allow it.
What About Docker Compose Internal Networks?
You can also define networks as internal: true in Compose. This creates a network with no external access — containers can’t reach the internet through it.
networks:
  secure-backend:
    driver: bridge
    internal: true
This is useful for databases that should never make outbound connections. If your database container gets compromised, an internal network prevents it from phoning home.
I use this for my Postgres and Redis instances. They don’t need internet access, so they don’t get it.
Common Mistakes I See
Putting everything on one network
I’ve seen Compose files where 15 services share one network. At that point, you might as well use the default bridge. The whole point of network isolation is compartmentalization. If every container can reach every other, you’ve lost the benefit.
Publishing ports unnecessarily
Just because you can publish a port doesn’t mean you should. If you’re using a reverse proxy (and you should be), don’t publish ports for web apps. Let Traefik or Caddy handle the routing internally.
# Bad: publishing the app port directly
ports:
  - "8080:80"

# Good: let the reverse proxy handle it
labels:
  - "traefik.enable=true"
  - "traefik.http.routers.app.rule=Host(`app.yourdomain.com`)"
Mounting the Docker socket everywhere
I’m guilty of this. The Docker socket gives any container with access to it full control over Docker. If you mount it, the container can spawn new containers, delete volumes, and access any network. Treat it like a root password.
Only mount the socket in containers that absolutely need it — Traefik, Portainer, Dozzle. And restrict those to the private network.
Ignoring the default bridge
Containers you run without specifying a network still end up on the default bridge. If you docker run something for testing without --network, it can talk to other containers on the default bridge. Be explicit about networks. Always.
FAQ
Q: Does this work with Docker Compose v2? Yes. All the examples in this article use Compose v2 format. External networks are supported in both v2 and v3.
Q: Can I use this with Nginx Proxy Manager instead of Traefik? Absolutely. The same network architecture works with any reverse proxy. The only difference is how you route traffic — NPM uses a web UI while Traefik uses labels. The network isolation is identical.
Q: What about Caddy? Same pattern. Caddy can use labels too, but many people use it with a static Caddyfile. Either way, put it on the public network and route traffic from there.
Q: How do I access admin tools on the private network? Three options:
- VPN (WireGuard, Tailscale) — connect to your VPS’s private network
- SSH tunnel —
ssh -L 9000:localhost:9000 your-vps - Authentik or Authelia in front of the proxy — less secure than VPN, but better than nothing
I use Tailscale. It’s free for personal use and takes 5 minutes to set up.
Q: Do I need to recreate my containers to change their network? You can connect and disconnect containers from networks without recreating them:
docker network connect internal my-container
docker network disconnect traefik-public my-container
But it’s cleaner to update the Compose file and run docker compose up -d.
Q: What if a container needs internet access but not inbound access?
Put it on internal. Containers on a regular bridge network can still make outbound connections. Only internal: true networks block outbound traffic.
Q: Can I use this on a Raspberry Pi? Yes. Docker networking is architecture-agnostic. The same Compose files work on ARM64.
Q: Does this work with Podman? Podman’s networking model is different (no daemon, rootless by default). The concepts are similar — create networks, isolate containers — but the commands differ. This guide is Docker-specific.
Q: How do I monitor network traffic between containers?
Use docker network inspect to see which containers are on which network. For deep traffic analysis, deploy a tool like netshoot on the same network:
docker run -it --network traefik-public nicolaka/netshoot
# Now you can run tcpdump, curl, ping, etc.
Q: What about Kubernetes / k3s? Kubernetes has its own network model (CNI plugins, network policies). This guide is for Docker Compose setups. If you’re running k3s, look into Kubernetes Network Policies instead.
The Bottom Line
Docker’s default networking is fine for a development machine. For a self-hosted server that’s exposed to the internet, it’s not enough.
Three networks — public, internal, private — cost nothing to set up and dramatically reduce your blast radius. If one container gets compromised, the attacker doesn’t automatically get access to everything else.
I learned this the hard way, but you don’t have to. Set up your networks, isolate your databases, and stop publishing ports you don’t need. Your future self — the one who doesn’t have to explain to their family why the shared photo album is gone — will thank you.
Stay in the loop 📬
Get self-hosting tutorials, tool reviews, and infrastructure tips delivered to your inbox. No spam, unsubscribe anytime.
Join 0 self-hosters. Free forever.